
PHVFX X SCAD: Week 3
- tvalencia2010

- Sep 27, 2022
- 3 min read
Updated: Oct 6, 2022
R&D
As we continue with the plates that we have after shooting, our team is beginning on our R&D stage.
Our outsourcing rigger, James Kislenko, created a demo of what the vine rig may look like while talking about other potential options. He also linked a the Paint Effects tool in Maya which creates a mesh that could be used to generate leaves. While it is not the growth we were looking for, it is a great alternative and backup plan in case the L systems do not work.
Emma has started on the preliminary model of the main flower. It will be modeled and given to James who will rig the open and close of the flower so we have more control over it. Here is the initial turnaround:

As the vine is growing up the arm, there are little offshoots of smaller flowers and leaves. While James is working on the main stalk of the vine, I am working on a way to have these offshoots grow on the vine as it is traveling up. To do this, I am working in Houdini using the L-System feature. I used this tutorial linked below as an introduction to the behavior and how to manipulate the tool to get the desired look we want.
This is a flipbook of the first test with trying to get different variations in the curve, branches, and angles. The next step is to try to use this tool to get our version of the vine flowers.
L System Information
Lsystems essentially work by a string of rules that determines its path. Like in some coding languages, it will run through the rules depending on how many generations it has which will most likely determine its height. This is some of the basic syntax however the interpretation can vary depending on what is around it:
F: Forward
+: Right
-: Left
[]: Are used to continue an off branch of the original base.
[: Start
]: End
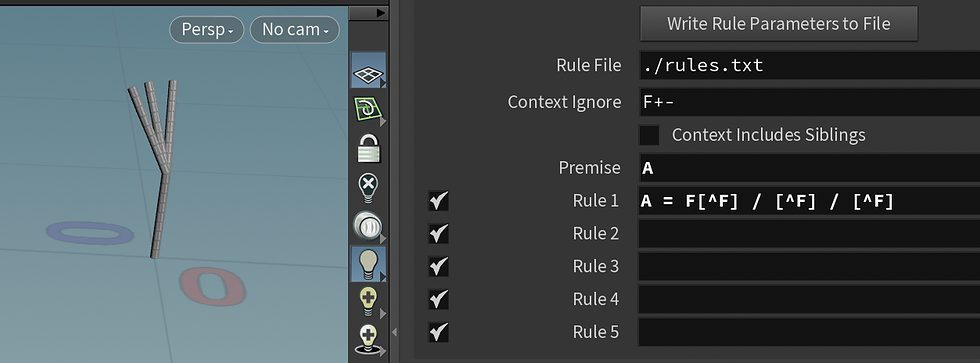
Here is an example of what a rule may look like and how the system would execute it.

Looking under the rule tab is where functions go. The system will run the premise first, which is the order it will execute. Rules can be used for variables for the premise.
For example:
Premise: A
Rule 1: A = F+F[+F]
A is defined in the rules so that A can be called at any time.
(): Are used to have precise numbers for certain actions.
For example:
F(0.01)
The branch will go forward 0.01 units, it determines length
() after a + or - will determine the angle in which it goes right to left
/ is used for roll over. It will angle each branch extension a certain angle. Using () with a certain angle will give the user more control over the angle which rolls over.
For example:
As many variables can be used as needed as long as it is defined in a separate Rule space and it can make the code look a lot cleaner. Here is an example of using variables to help make your code look cleaner. Instead of this,

Try using variables:

It is the same, but it makes it more readable to someone you may need to pass it on to.
It will call B three times within A.
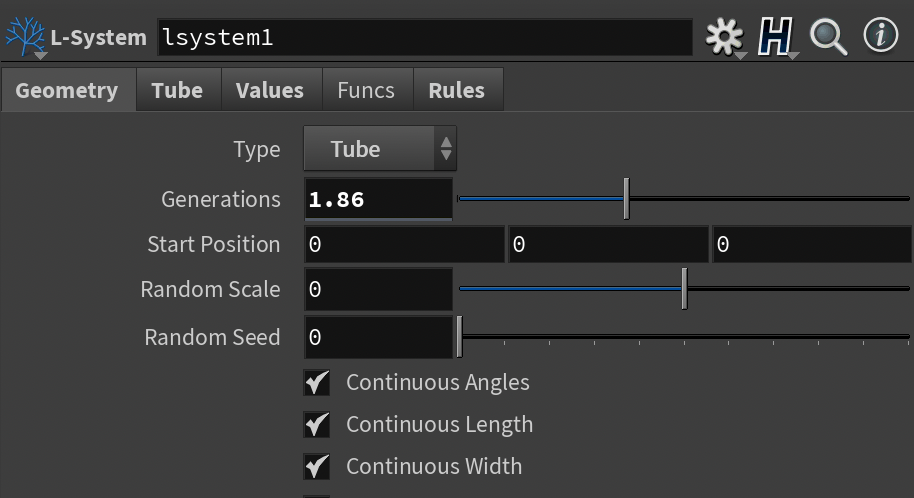
The number of generations decides how many times it runs the rules. By default, generations will automatically gradually grow. In order to get a better view of stepping generations, you must disable these check boxes under the geometry node:
- Continuous angles
- Continuous length
- Continuous width
Bend
An & symbol will signify a bend within the growth pattern so something like this:
&(10) F(0.04)
Means it would have an upward bend of 10 degrees
Meanwhile the ^ symbol signifies downwards bend.
^(10)F(0.04)
Means it would have a 10 degree downwards bend
Thickness Scale
An ! will affect the thickness of the stem and will taper the ends
The premise does not have to be a variable. For example a premise can look like this:
Premise: FA
It grow forward then execute A.
More documentation to come
Comments