
PHVFX X SCAD: Week 5
- tvalencia2010

- Oct 20, 2022
- 3 min read
Updated: Oct 24, 2022
As we head into week 5, our team is mostly focused on getting out camera tracking, more look dev, flower rig, and vine growth.
After much consideration, unfortunately we were not able to continue with the Lsystem technique that I was doing my R&D on. We hope to still use it for the face veins, but we are unable to use it for the vine. The issue was the growth of each of the L systems that was copied to each point
My priority list for this weekend:
Using this Ivy growth technique on stable head for R&D
Using the meta human arm with little movement to make sure that it works or if I would have to key the points with the ivy growth technique
Trying to get substitute geometry to check camera for integration
Particles- follow to curve test (if have time)
With help, I was able to find some videos with good techniques to pull from. The first tutorial is making a solver driven by attribute wrangles and vops. This will simulate the gradual grown the the stalk of the vine.
To ensure the normals are nice and facing the correct way, using a normals node and checking the overall shape of the normals
Note: if the normals are too big, or if the user wants to control the size. Press D on the viewport and under guide there should be Normal Scale and can adjust. Also Under the normal node, adjusting the normals to points will help later.
I was given the mesh geometry from Emma, who animated a metahuman and rigged it to the movement of the arm. It was the rough animation. The first issue I had with the mesh was that there were no normals. A resample node fixed this issue.
This is the original mesh merged into a separate geo container

This is the normals viewed after a resample.
This is important as the normals will allow the curve to stick and will determine in which direction the vine will grow.
Because the curve is following the deforming geometry, there is some preparation that needs to be done as the curve will not be static.
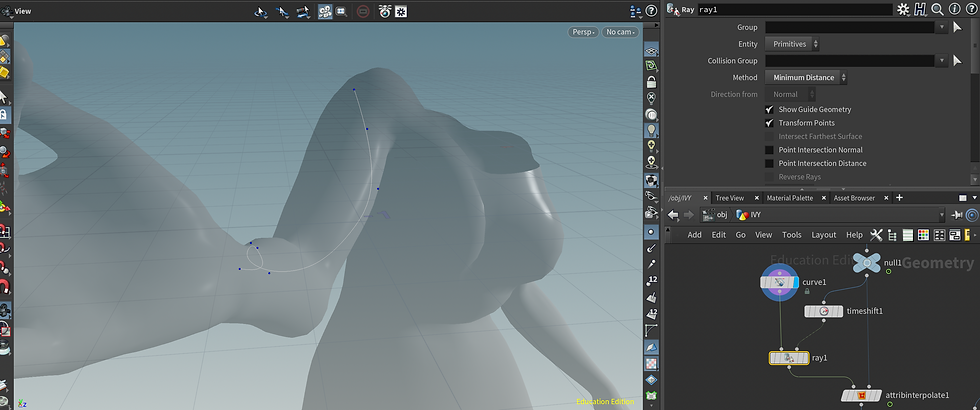
The technique that I used was from this forum that is the time shift, ray, attribute interpolate method.

The time shift is holding the first frame of the mesh movement and that is fed into a ray node. A curve node is drawn onto the surface of the mesh using the primitive snapping option. Personally, I used a Nurbs curve and because the points are on the surface and the Nurbs curve will be a smooth curve, it looks as if the curve made will travel inside the arm, as seen below and I will use both a transform node and attribute wrangle to push it away at a later time. For now, it is about getting the curve to move with the deforming mesh. As long as the actual points are snapped onto the primitive, it will move.
Both the curve and time shift is being fed into the ray node which will project those points onto the mesh. The original mesh geometry and the projection is being fed into the attribute interpolate.

First the ray will give the attribute interpolate the Prime Num Attribute and Prime Num UV Attribute data. Prime Num Attribute collects the data on the number of primitives that are hit by the points while the Prime UV Attribute focuses on where, specifically the coordinates, those point hit on the primitive.

The attribute Interpolate node will take that data given from the first input and the source and keep those points consistent on the deforming geometry.
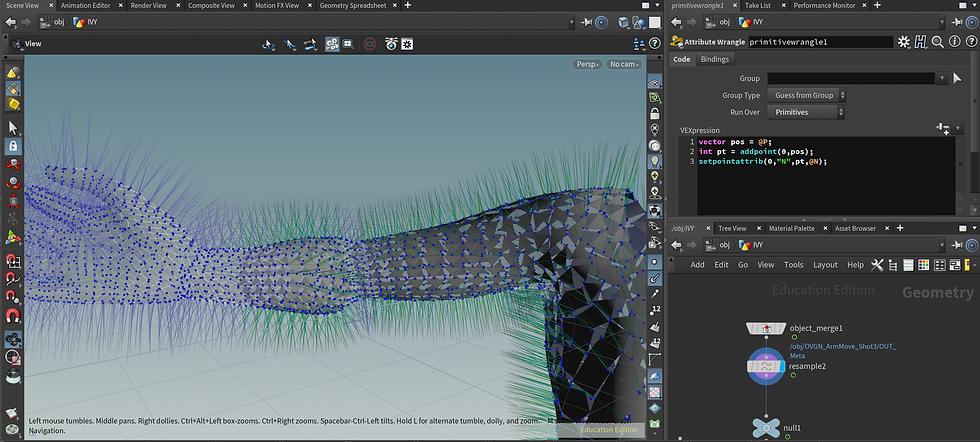
Just like the curve, I had to fix the normals so that the points will be directed in the correct way. Under another object merge of the original mesh, I added another sample node.

The issue is the normals are still not aligned properly. Therefore, I used a primitive wrangle to add the normals and properly line them.


After the attribute transfer of Normals on the points, now the points on the curve have normals that are growing away from the arm. This will help with not having intersecting geometry.
Comments